Showing posts with label master. Show all posts

Tuesday, September 24, 2019

We Also Did Some Finish Work

At the farm, there is pretty much always something that you could paint. This year, we have painted...

The trim in the living room

Yes, it's basically the same color as the old trim.
All sorts of exterior trim

Love that bucket van
And, over Labor Day weekend, the back wall of the dining room and the doorways!

Blue!
We also painted the ceilings in both the living room and the dining room, which was an absolute nightmare. In the future, remind me how much I hate painting over my head.

We also got some new furniture, which is at least exciting for us.

In the master, we found a dresser at a barn sale and some nightstands in my best friend's storage unit.

Now we don't live out of suitcases. It's like we're civilized or something.
That allowed us to move the little dresser up to the yellow bedroom, which is now pretty overnight-guest-worthy.

Who's coming to visit me?
We also got a barrister bookcase for the living room, which I apparently don't have a good picture of. And then... we got a wardrobe.

The thinking with the wardrobe is that in the bedrooms upstairs, there isn't really any good storage space -- there are no closets, and the room you're seeing above is the big one -- the others are going to be lucky to get more storage than a nightstand. So we figured one wardrobe in the hall would give some shared space to hang things up, etc.

We measured. Then I went out to Massachusetts with the aforementioned best friend to do some antiquing. We found many fascinating things that were not wardrobes.

Not a wardrobe

Perplexed Bigfoot is not a wardrobe.

Terrified goat head is not a wardrobe.

Garden-art velociraptor is not a wardrobe. I don't know how this didn't come home with me.

I don't know what this is, but it isn't a wardrobe. I hope.
 Then, after much searching, I found a wardrobe! It was the art-deco style Chris likes! It would fit in the space! And that was when my BFF said "well, if THAT'S the kind of thing you're looking for, I have one in my storage unit. I actually have two."

So then I came home and bought hers. And we measured it. We really did. And we decided it would just barely fit in the space... and then we got it up to the farm, and into the living room... and decided we weren't actually sure how to take it up the stairs.

After some false starts, during which we each ended up having to climb onto and over the wardrobe while it was half in the stairwell, we took off everything that would come off.

Now with 100% fewer doors and drawers!
At that point, we were just barely able to carry it up the stairs, slide it along the hallway, and shimmy it into position, where it is, as measured, a perfect fit with roughly one inch to spare.

Narnia not included.
So now if you visit us at the farm, you could hang things up, if we had hangers up there, which we don't. Note to self: take a few hangers up next time.

Thursday, November 22, 2018

Thanksgiving 2018

We've owned the farm for (very slightly over) two years now, and while we still have a lot of projects to work on, we've continued to be pleasantly surprised by how smoothly most projects have gone. It has really been a fun project overall, and we have a lot to be thankful for. In no particular order, here's our farmhouse top 10 list for Thanksgiving.

1. Heat
Seriously, heat is great. We've been lucky to have the wood burner since the beginning that really kicks out a lot of heat, and how we're going to be extra toasty with central heat that we can schedule to turn on before we come up. 


2.  Good neighbors
We've been so lucky with our farmhouse neighbors. They're often stopping by in the summer with garden produce for us, and last winter, one of the neighbors plowed a path up our driveway all season so we could get in when we came up. They've shared what they know about the place, and the guy across the street even took us on a tour around the area. 

3. The front porch was saved
You may remember that I was prepared to cry if we had to lose that nice stone porch, so I'm definitely thankful that not only were we able to support and save it, but improve the steps so that the whole thing is a charming place for some quality front-porch-sitting... in those few moments we have for just sitting around.


4. Doors that open
It seems weird to be thankful for doors that basically just do their job, but in a house where we didn't get any keys at closing, everything's not-quite-straight, and most of the doors are at least a little sticky, we're definitely glad to be at a point where all available doors can be opened, closed, and (where applicable) locked. 

5. People pitching in
From the first moment that Tony Bucket hurried back from his dinner so we could write up an offer on the farmhouse before heading home, people have been lovely about helping to make this happen. My father, of course, has been basically a rock star. He's been ready to help with any project, and always does a careful and beautiful job. My mom has stripped wallpaper and painted. My sister has come from out of town to strip wallpaper and refinish windows. I think just about everyone in Chris's family has been part of the ongoing project to move the leftover rocks away from the front porch.


6. History lessons
One of the most fun parts of the farmhouse is that people seem to enjoy telling us about what the place was like before we owned it. We've had a former resident come for a tour and to share her stories. The neighbors are always a good source of information about what's been done and when. One of my coworkers is even the nephew of the man we bought it from. We have a lot of fun walking people through the place and listening to them share what they remember about how it used to be.

7. A roof over our head
The farmhouse roof is steep and can't be stepped on, making it one of the more terrifying parts of the house. Despite that, we've been able to get up to make the necessary repairs to keep the water (and sometimes the bats) out.


8. Hyacinth Bucket (van)
We would definitely not have made the progress we have without the bucket van. We've done roof repairs. We've scraped and painted. We've removed and replaced storm windows. We've moved in a boxspring. We've picked apples. We've repaired a chimney. And through all of that, we haven't had to worry about falling off ladders. Seriously, that van is great. 10/10, would buy again.

9. We can actually vacation at the farm
We have a functional kitchen, a television, and two complete bedrooms. We have a working bathroom and a window a/c unit. We're finally at the point where we don't have to necessarily hustle every single second of every single visit to the farmhouse, and that's a very good feeling, indeed.


10. The water's still flowing
Even when we winterize, we have a steady outflow of water. We've cleared the ditch a bit, and we may have successfully found the outflow for the basement floor drain (which may mean less basement flooding in the future?). In a world where even pretty nearby, access to clean water isn't a guarantee, the fact that we have water that literally is constantly flowing through our house at all times is pretty great.

Happy Thanksgiving, all.

Saturday, July 15, 2017

Things I've Painted So Far

Since these rooms aren't really done, I figured a quick process update would be enough. I painted some things.

First, I painted the upstairs back bedroom. It was in the best shape of all the bedrooms, and a fresh coat of paint cheered it right up.

Before
After
Soon the floors and trim will be painted, the light fixture will be installed, the window will be reglazed, we'll find a door for this room... and then it's all decor from there out!

The other painting project was the conclusion of the earlier project of revealing and sanding the floors in the master bedroom.


Scraped and sanded


Painting!

Painted floors
The floors weren't in good enough shape to refinish -- the wood was soft and pretty roughed up in a number of places -- and we figured that painting would have been a more durable and convenient coating "back in the day" than having to routinely wax and/or oil the floors in the private family quarters.

So, two painting projects down!

Thursday, July 13, 2017

All Mod Cons

After spending the winter bucket-flushing our toilet at the farm, it is with great excitement that I reveal that we now have a true flush toilet AND hot running water.

All modern conveniences! Also, I need this sign.
This was not an easy task. First, we (well, Chris) had to do all the initial plumbing repairs in the basement. Then we dragged the old hot water heater out of the basement. Even after we realized it had been sitting there full of water for ten years while the house was empty -- and immediately drained it out -- the thing was still ridiculously heavy. There are no pictures of us pulling it out because we were too busy trying not to be crushed... in the end, we pulled it up the steps with the truck.

The next step was the easiest one -- we hired lovely people to come to our main home and do an HVAC overhaul, which included installing a new hot water heater.

We then hauled our old water heater up to the farm, wrestled it down the steps -- thank goodness for the slightly creepy basement storm door -- and Chris got to work reinstalling the pump for the house, installing the water heater, and fixing joints in the plumbing that suddenly decided it would actually be best if they were leaking just a little. Finally, everything looked good from the basement, so we took our new plumping for a test drive.

"New" water heater


The toilet flushed like it had been waiting for years to be properly flushed. I picked up some bowl cleaner, and got it a bit spiffed up. The toilet has a new seat coming to it still, but it pretty much got right to work.

And then we tried the faucets...

and got nothing.

The water was clearly pumping. We could even hear it move into the pipes. And then... no water. With some trepidation, we asked ourselves... "where is the water going?" There's not that many places water can go, after all, and it didn't seem to be running out inside the walls. We could get water out of the shower head, but not the bathtub faucet. We were left with only one possibility. The water was stuck in the pipes.

To test this theory, Chris opened up the faucet handle on the tub.

I promise, the coloration has been altered a LOT to make it look this grimy.
I've tried to change the tinting on the photo above so you can see a little more easily the gush of water that's coming straight out of the wall where the bathtub faucet used to be. The water was definitely flowing! Now we just had to find a better way to let it out.

We're coming to save you, water! Just hang on!


Fortunately, the previous owners had -- we think -- installed a new bathtub, which had necessitated cutting a hole in the wall between the bathroom and the master bedroom. To fix the whole, they had cut a piece of drywall and then, as far as we could tell, gooped drywall mud around the joints with their hands. Chris removed this panel, umm, rather easily.

And indeed -- the water was in the pipes! And the pipes... well, the pipes had been sitting for at least ten years in a house that had not been quite properly shut down. The pipes were clogged with dirt and rust and general gunk. After taking things apart -- not only in the tub, but in the bathroom and kitchen sinks -- and reaming out the pipes, putting them back, running a little water, then repeating the whole process a few more times, we had running water!

Yes, it looks like we have a magical chocolate fountain for a kitchen sink, but don't drink that.
 Ok, so then we did it all a few more times, and then let the pipes flush for awhile. That's more like it. And that is how we came to have hot and cold running water, a functional shower, and flush toilets.

Oh, look! Water from a faucet!

Wednesday, February 8, 2017

What's Under That? Flooring Edition

We're finding that one of the joys of buying an old house is the ongoing game I call "What's Under That?" The rules of the game are simple: one person identifies an aspect of the house and says "I wonder what's under that," and then all players start removing layers in order to answer the question. Depending on the surface, this game can have multiple rounds on the same surface.

We started this playing this game literally about fifteen minutes after closing on the house (and that's only because we had to drive back across town to get to the farm).

Originally, all the upstairs bedrooms were carpeted. The carpeting in the green room was fairly normal, but the other two rooms had something with a more woven texture that I'd be more likely to call a "rug." I'm not really sure why I feel like there's a distinction between "rug" and "carpet" in a situation where it covers a room's floor entirely, but you'll see what I mean (I hope).
This is a "rug..."

But this is "carpet."
Fortunately, neither rugs nor carpet was actually installed with any skill; basically, they were all just cut to size and laid on the floor; in the green and paneled rooms, the carpet was stapled or nailed down right by the doorway in order to keep the door from snagging on it. Other than that, carpet removal was easy -- I just rolled it up.

In the back bedroom, that was all there was to it. I rolled up the rug, swept up the layer of dust, and found the wood floor. You can see in the picture below that the floors are partially painted; apparently, that's not uncommon; why waste perfectly good paint (and labor) when you're just going to put a decorative rug in middle of the room?
Back bedroom without carpet
In the front bedrooms, though, the game continued: What's under the carpet? Linoleum.
Some of that nastiness is dust. Some of it really is the pattern of the flooring.
Yes, the thing on the floor in the above photo is the rug. See? You couldn't ball up a room full of carpet like that.
This linoleum was at least a little better looking.
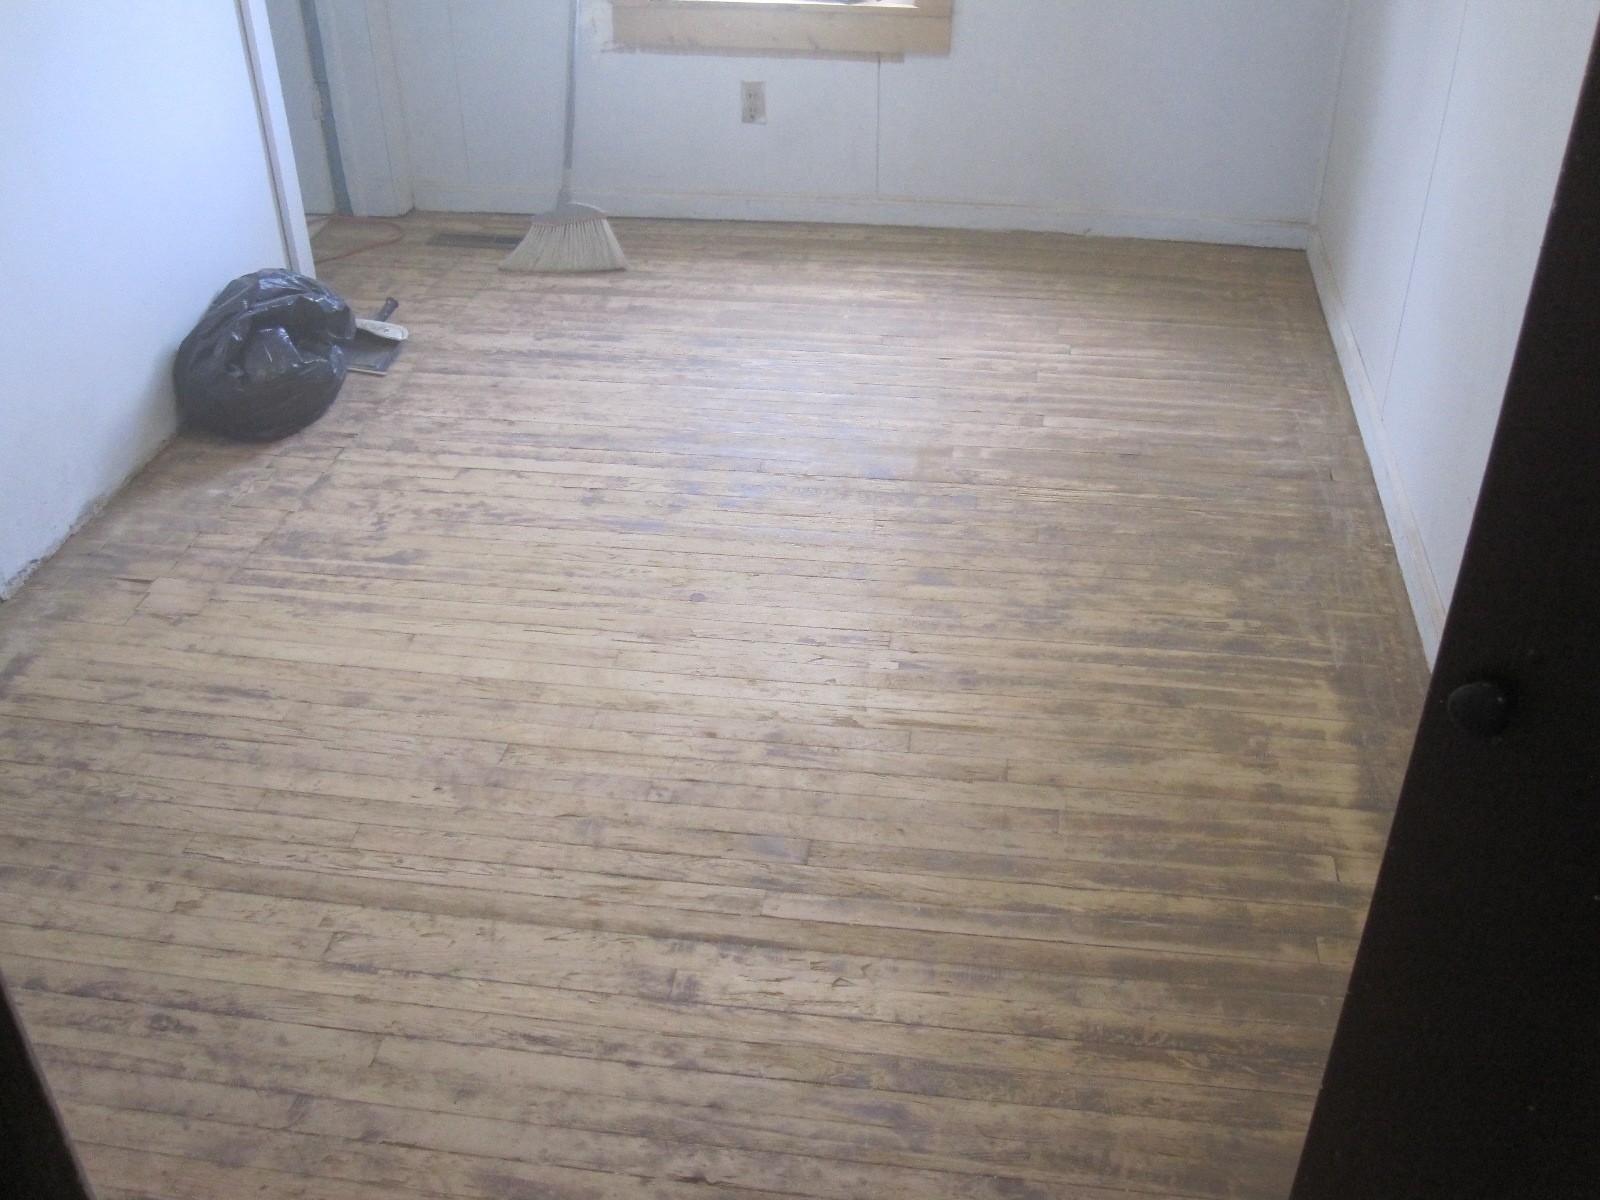
Fortunately, the linoleum wasn't installed any better than the carpet had been -- once again, this was just a roll-and-remove job in both rooms. And what's under the linoleum? Ah, there's the wood floor we've been looking for!
This room looks a lot MORE paneled now that everything is wood.

This one, however, looks a lot less green. Much better!
The best part of this project was discovering that the upstairs floors are in excellent shape. They have a mix of wide and narrow floorboards that's apparently pretty common in old homes -- you kept the good materials downstairs, and in the more private spaces upstairs, people might just use what they had left over. The floors have all seen paint in their lifespans, and the plan is just to scrub them up really well and paint them again so the whole upstairs is uniform in floor color.

In fact, the upstairs floors went so well that I went downstairs to the master bedroom and decided to play again. Certainly the tiles that had been laid in the master weren't original to the house, so what was under those?
You don't have to be an expert on 1880s decor to know this isn't original.
 Sadly, these tiles had been installed using actual technique and materials, so this round of the game involved a lot of scraping. Chris took over this portion of the project because his (literal) strengths were more suited to the intensity of the scraping involved. As of right now, almost all of the tile is gone.
Much better.
We think that both the age of the tile and the cold (it's winter in Michigan, and the farmhouse is unheated this winter since "new furnace" is on the to-do lost) worked in our favor because both tile and whatever is adhering it to the floor are fairly brittle. It's a lot of work, but it comes up in surprisingly big chunks. This floor will need more love -- thanks, adhesive! -- but still should mostly be a matter of sanding it down to smooth things out and then staining or painting.

I'm hoping to play this game again in the parlor, where the floors are almost certainly a match to what's in the master bedroom, just without the layer of tile (we think -- we did have a peek under the carpet, and it looks like a straight shot to the wood). Chris likes carpet, but it's just so worn out and threadbare in all the main traffic areas that I'm still hoping to see it go even if it cleans up ok.

We'll also have to play this again in the kitchen and dining rooms once the chimney comes out and we're able to take out the weird pieces of wall/closet that currently divide the spaces. The floors don't match, and there's currently a bit of a threshold between them, so that will have to get matched up eventually. For now, we've still got that little bit of master bedroom to uncover, and then a lot of finishing to do before this project is complete.

Sunday, February 5, 2017

The Basic Tour: First Floor

Seems like it might be time to get a clearer picture of the basic layout of the farmhouse, so this will be just a quick tour with pictures that are as "before" as I can find right now.


You've probably seen this one before.
Ok, let's say you enter through the door you see in the picture above. That's going to take you first off into the lean-to.
Lean-to
The rather see-through wooden door that you're looking directly at in this picture is the door you just "came in" through. The door that's propped open on the left leads into the kitchen. Right now, we're mostly using the lean-to as a staging area where we can store lumber or work on outdoor projects out of the wind.
Kitchen
You walk through that door into the kitchen (so, you just walked in through the door you can't see behind the post on the far right). In this picture, you're looking into the kitchen from the dining room. Eventually, the weird dividing wall between the two will come down, but right now, the closet directly behind the step stool is supporting a chimney that's still in place on the second floor/roof.
Dining room

Wood burner
From the kitchen, you walk into the dining room. These pictures are already pretty "in process" -- the dining room had a drop ceiling when we bought the place, which has already come down, and the walls on either side of the wood burner were previously covered in tongue-and-groove paneling (which was painted white on one side, but not on the other, because reasons). In the picture on top, you can see two doorways. The one on the left leads to the door down to the basement and then to the bathroom, which opens into the master bedroom. The doorway on the right leads to the parlor/living room, which also opens into the master bedroom, so you can walk in a full circle all the way around the first floor.
Parlor
We'll go through the door on the right. This is the parlor. The door you see leads out onto the stone porch in front of the house -- there's a door onto that porch from the dining room, too -- so this is where you'd come into the house if you were fancy (and if the door wasn't swelled shut). We're hoping to put in a bigger window in the spring to fill in that weird space on the wall that doesn't have paneling. This photo is taken from the master bedroom, which is where we'll head next.

Master bedroom
The rooms are fairly small, so they're all kind of hard to get pictures of. This is the master. Through the doorway, you see the parlor -- that weird accordion door is high on the "replace" list. On the left, you can see the tile that was down in the master when we bought the place, but obviously that's coming up in favor of the wood that's underneath. This picture is taken from the bathroom, which you're not going to get a picture of because the rooms are small, so all you can really see is a picture of a fairly standard (and not in any way charming or vintage) tub/shower.

Coming soon -- the tour continues upstairs!